Torki Code
Source Control and Git
Overview
The Source Control pane shows what has changed in your project since the last commit. From it you can look at each change, stage files, commit them, and Pull from or Push to your remote. The branch name in the status bar switches to another branch or creates a new one.
Torki can help with git when you ask, but on a Mac it does less than you can: Torki itself only checks the status, shows diffs, reads the history, stages and commits. Branches, Pull and Push are yours to do, with the buttons described here or in the built-in terminal.
What it needs
Torki AI for Mac 1.10.8, signed in, with a folder open. Git must be installed on the Mac (it comes with Apple's Command Line Tools). If the folder is not a git repository yet, the pane offers to make it one. Pull and Push need the repository to have a remote, such as origin.
Get started
1. Open Source Control
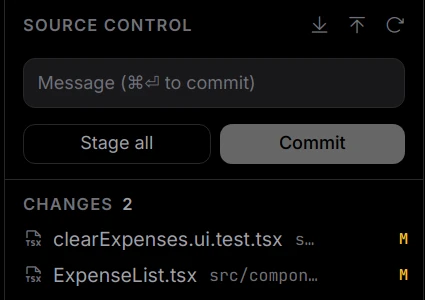
Click the Source Control icon in the sidebar (the branch icon, third in the row). The number on it is how many files have changed; it stops at 99+.
2. Look at a change
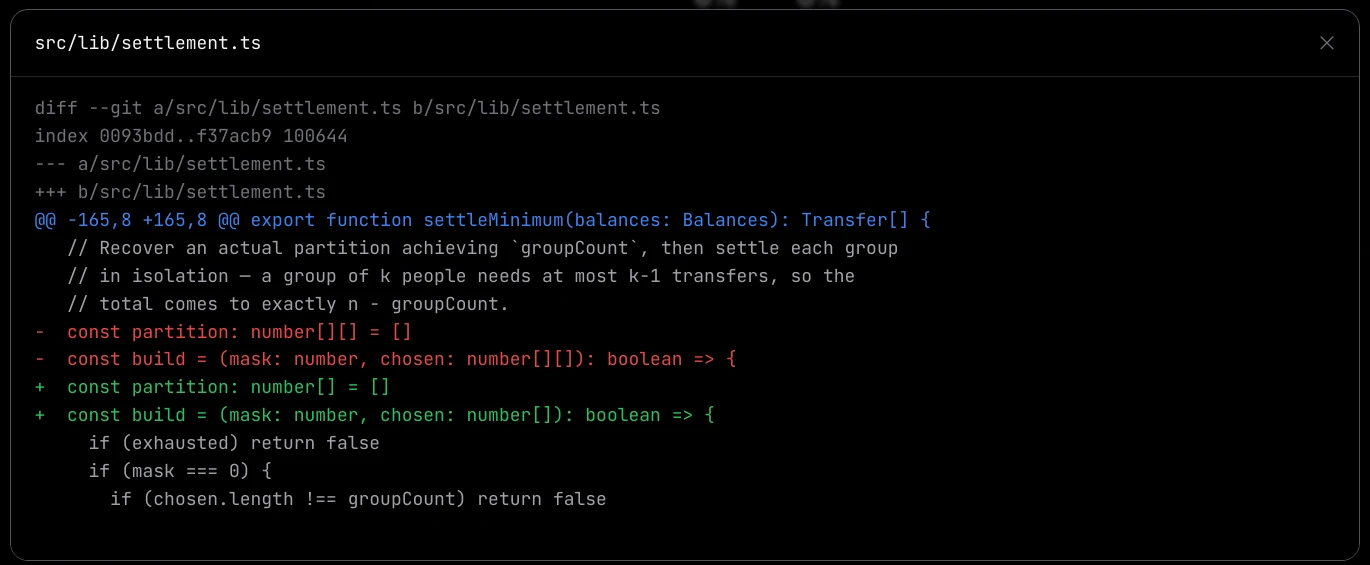
Click a file in the list. Its diff opens over the window, titled with the file's path (or "path (staged)" for a staged file). Close it with the ×, a click outside it, or Esc.
3. Stage what you want to commit
Click Stage (+) on a file's row, or click Stage all to stage everything. Staged files move to the Staged group. Click Unstage (−) to take one back out.
4. Write a message and commit
Type a message in the box marked "Message (⌘⏎ to commit)". Then click Commit, or press ⌘⏎ (Command and Return) in the box. You see "Committed".
Staging, unstaging and committing from this pane are your own actions, so they never raise an approval card, in any permission mode.
5. Push your commits
Click Push to the remote, the up arrow in the pane's header. You see "Pushed". See Pull and Push below.
The pane in detail
Groups
- Conflicts — "These files have merge conflicts. Resolve each one, stage it, then commit." Edit the file to resolve it, then use Stage (marks it resolved).
- Staged — what the next commit will contain.
- Changes — modified, deleted and untracked files that are not staged.
Row buttons
- A changed file: Discard changes (↺) and Stage (+).
- An untracked (new) file: Stage only. There is no Discard for a file git has never seen.
- A staged file: Unstage (−).
Discard changes throws your edits away. It raises a Delete a file approval card in every permission mode, and it asks every time: an "always allow" tick never covers it. A discard is not recorded in the undo list (see Undoing a Change), so it cannot be undone there. Read the card before you approve it.
When Commit is greyed out
Hover over Commit and its tooltip says why:
- "Stage the changes to commit first: + on a file, or Stage all"
- "Nothing to commit: no changes yet"
- "Resolve the conflicts and stage those files first"
Other messages you may see:
- "A commit needs a message." — type one first.
- "Nothing is staged, but there are changes in the folder. Stage the files you want first…"
- Git's own sentence, when git itself refuses — for example "Please tell me who you are" (see the FAQ).
Other states
- No changes — "Working tree is clean on branch."
- Not a git repository — click Initialise a repository to start tracking the folder ("Repository initialised").
- Git could not read this folder — followed by git's own explanation, and a Refresh button.
- Torki will not touch this repository — the repository's settings try to run commands or point its files somewhere else, so Torki leaves it alone and says why.
- "Only the first N changes are shown. Add a .gitignore so this folder reports what you actually work on." — more than 2,000 files have changed, usually because a build or dependency folder is not ignored.
The pane refreshes by itself a moment after Torki runs a command or a git step, and shortly after output in your terminal settles. If it still looks out of date, click Refresh at the top of the pane, or use Refresh git status in the command palette (⌘⇧P).
Pull and Push
The two arrows in the pane's header, to the left of Refresh, are Pull from the remote (down arrow) and Push to the remote (up arrow). They work on the branch you are on.
- Pull brings in new commits from the remote, but only when your branch can simply move forward to them (a fast-forward). You see "Pulled", and the Explorer and the pane reload. If your branch and the remote have both gained commits, the pull stops with git's own message and nothing changes; merge or rebase in the terminal.
- Push sends your commits to the remote. You see "Pushed". A branch the remote has never seen is set up on
originthe first time you push it. - If either fails, git's explanation appears in an error message at the bottom right of the window.
- The button is greyed out while it works. A pull or push is stopped if it takes longer than 10 minutes.
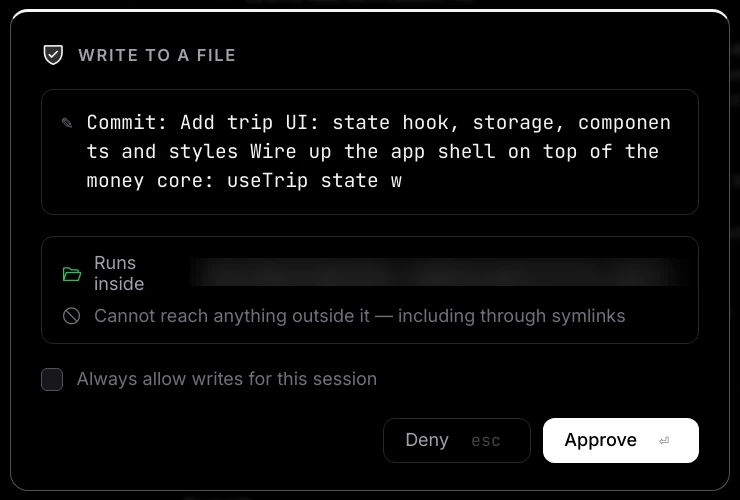
Unlike Commit, Pull and Push go through the same check as a file write. In Manual mode, clicking either one shows a Write to a file approval card first, with the detail "Pull from the remote" or "Push to the remote". Click Approve (or press ⏎) to go ahead. Click Deny (Esc) and nothing is pulled or pushed. In Accept edits and Full auto there is no card.
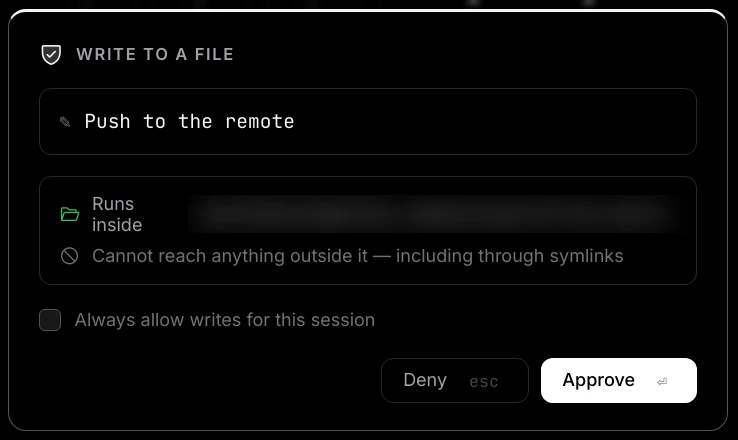
Ticking the card's box, Always allow writes for this session, does not stop the next Pull or Push from asking: in Manual mode each one asks again. To stop being asked, switch to Accept edits.
Pull and Push do not ask for a git password. If your remote's address starts with https://github.com and Push (or Pull from a private repository) fails with an authentication error, run git push or git pull in the built-in terminal, where your usual git sign-in applies. Remotes that use SSH, such as git@github.com:you/app.git, are not affected by this.
Branches
The current branch shows at the left of the status bar, and after the folder name at the top of the window.
Switch to another branch
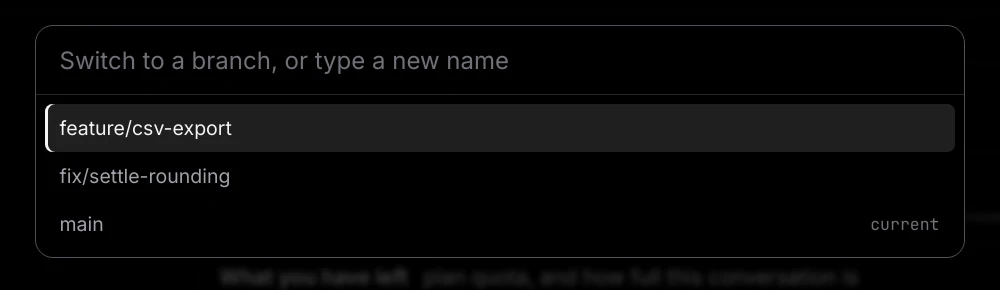
- Click the branch name in the status bar (its tooltip reads "Switch branch"), or choose Switch branch… in the command palette (⌘⇧P).
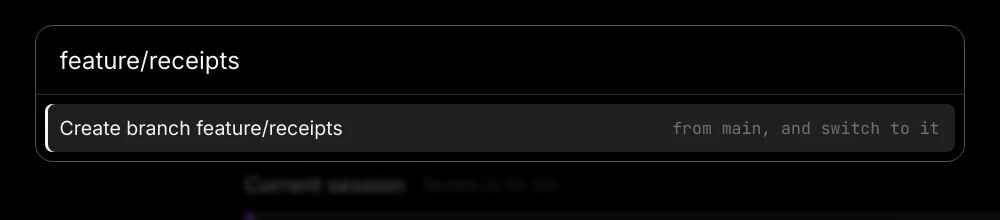
- The picker opens with the placeholder "Switch to a branch, or type a new name" and lists your local branches, the most recently committed first. The one you are on is marked "current". Type to filter the list.
- Choose a branch. You see "Switched to branch", and Source Control, the Explorer and your open tabs reload.
Create a branch
- Open the picker the same way and type a name that does not exist yet. Or choose Create branch… in the command palette; its placeholder is "Name the new branch".
- Choose Create branch name. The note beside it says which branch it starts from, for example "from main, and switch to it".
- You see "Created name and switched to it". Your uncommitted changes come with you to the new branch.
What you may see
- Git's own message, such as "Your local changes … would be overwritten by checkout", when uncommitted changes are in the way of a switch. You stay on your branch and your changes are untouched. Commit them, or put them aside with
git stashin the terminal, then switch. - "This folder is not a git repository. Initialise one in Source Control."
- "name" is not a branch name git accepts. — use letters, digits and
._/-, and do not start with a hyphen. - Choosing the branch you are already on does nothing.
Switching and creating branches are your own actions, so they never raise an approval card. The picker lists local branches only. There is no delete, merge, rebase, tag or stash here, and no way to check out a branch that exists only on the remote; use the terminal for those.
What Torki can do with git
Ask in plain words — "what have I changed?", "show me the diff for the login page", "commit this with a sensible message". Torki can:
- Check the status and show diffs of staged or unstaged changes.
- Read the recent history, to match how your project writes commit messages.
- Stage files and make commits.
When Torki stages or commits, it follows your permission mode. In Manual you get a Write to a file card whose detail begins "Commit:" followed by the message, or "Stage" and the file, or "Stage every change". In Accept edits and Full auto it goes ahead. Commits Torki makes are listed in the Ledger; see Sessions, History and the Ledger.
In Accept edits and Full auto, if Torki tries to replace a whole file that had uncommitted changes before the task began, and it has not read that file, it is stopped and told to read the file first, so your work in progress is not overwritten blind. In Manual you see every write on a card instead.
What Torki still cannot do on a Mac
Torki has no tool for branches, Pull or Push, and it cannot press the Pull, Push or branch buttons for you. The commands it runs on a Mac are confined: they may not write into your project's .git folder. Torki's own stage and commit go through a separate, checked path, so they work. Anything else that writes to .git fails when Torki runs it as a command, including:
- creating or switching branches (
git checkout -b,git switch) - tags and stashes (
git tag,git stash) - pull, push and fetch
- merge and rebase
Git reports "Operation not permitted", and Torki adds a note that this is not a broken repository and not a stale lock file. Do not delete .lock files or change permissions; it will not help. Do these yourself instead: the branch name in the status bar for branches, Pull and Push in this pane, and the terminal for everything else. Then ask Torki to carry on.
Projects on a server
For a project on a server, the git in Source Control runs on the server: status, staging, commits, discards, branches, Pull and Push all happen in the server's repository, as your ssh user, with the server's git settings and credentials. The project's .git folder stays on the server and is not copied to the Mac.
Torki's commands on a server are not confined, so there Torki can run any git command, including branches, pull and push. It asks first according to your permission mode, and in Full auto it asks before each command until you trust the server. See Working on a Project on a Server.
Everything else in the terminal
For stash, tags, merges, rebases and anything else, use the built-in terminal. It is your own shell, not confined, and it uses your normal git setup — your SSH keys, credential helper and ~/.gitconfig. See Terminal, Problems and Output for starting it.
- Press ⌘J to show the bottom panel, and click Start terminal if no terminal is running.
- Type the git command you need and press Return. For example:
git stashandgit stash pop— put changes aside and bring them backgit merge main— bring another branch's commits into yoursgit tag v1.0— mark a commitgit branch -d old-branch— delete a branch you no longer needgit log --oneline— the history, one line per commit
- Source Control and the branch name catch up shortly after the terminal goes quiet. Click Refresh if they do not.
Good to know
- Your repository's git hooks, such as
pre-commitandpre-push, do not run when you commit, pull, push or switch branches from Source Control or the status bar, or when Torki commits. They still run when you use git in the terminal. - Commits use the name and email in your
~/.gitconfig(for a project on a server, the server's git settings), so they are yours, whether you clicked Commit or Torki made them. - The commit message you are typing is kept while the same folder stays open. It is cleared when you open another folder or sign out.
- There is no history view in the pane. Ask Torki for "the last ten commits", or run
git login the terminal. - Pull, Push, switching branches and your own commits do not count as messages; they are not requests to Torki.
FAQ
Where is the Push button?
In the Source Control pane's header: the up arrow, Push to the remote. The down arrow beside it is Pull from the remote.
Can Torki create a branch for me?
Not on a Mac. Its commands cannot write to .git, and it has no branch tool. You can do it in two clicks: click the branch name in the status bar, type the new name and choose Create branch name. Then ask Torki to carry on.
Can Torki pull or push for me?
Not on a Mac. Use the Pull and Push buttons, or the terminal. In a project on a server, Torki can run git pull and git push there as commands, asking first according to your permission mode.
Pull failed with "Not possible to fast-forward".
Your branch and the remote have both gained commits since they last matched. Pull here only fast-forwards, so nothing was changed. In the terminal, run git pull --rebase or git pull --no-rebase (a merge), resolve any conflicts, then commit.
Push failed with an authentication error.
Run git push in the built-in terminal, which uses your usual git sign-in. This mainly affects remotes whose address starts with https://github.com.
Commit failed with "Please tell me who you are".
Git does not know your name and email yet. In the terminal, run git config --global user.name "Your Name" and git config --global user.email "you@example.com", then commit again.
Why does Commit stay greyed out?
Hover over it; the tooltip says why. Usually nothing is staged yet: stage files with + or Stage all. If there are conflicts, resolve and stage those files first.
Does Discard ask even in Full auto?
Yes. Discarding uncommitted changes always asks, in every mode.
The pane still shows changes I committed in the terminal.
It catches up a second or two after the terminal goes quiet. If it does not, click Refresh.